ZeroV99 Shipment Tracking - User Manual
1. Introduction
The ZeroV99 Shipment Tracking plugin extends WooCommerce by adding a dedicated “Shipped” order status, enabling store owners to provide tracking details to customers. It supports multiple carriers, customizable tracking URLs, and email notifications.
2. Plugin Features
- Adds “Shipped” order status to WooCommerce.
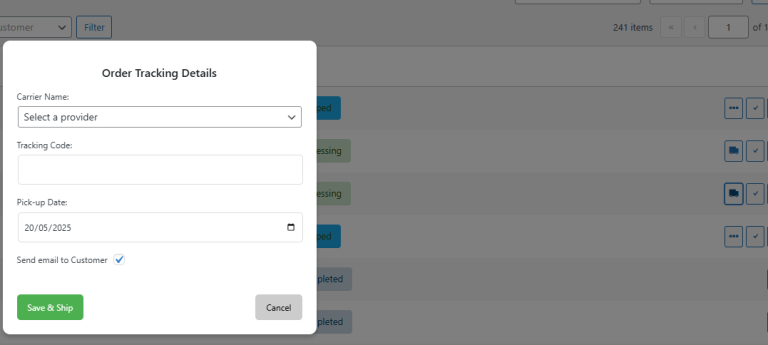
- Allows store admins to enter tracking details: tracking code, carrier name, and pick-up date.
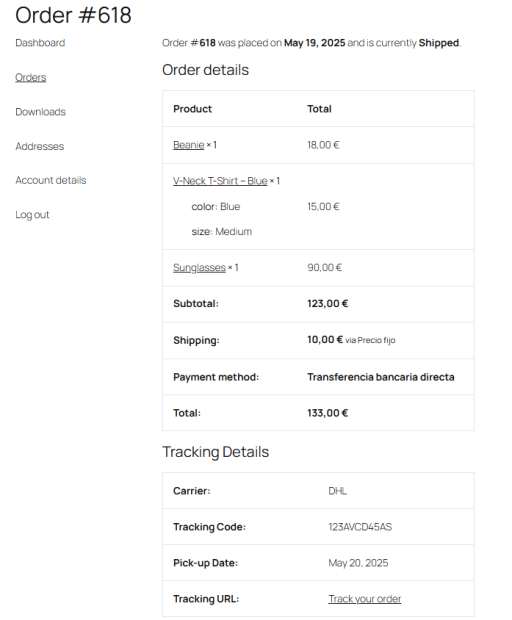
- Displays tracking information on the order details page for customers.
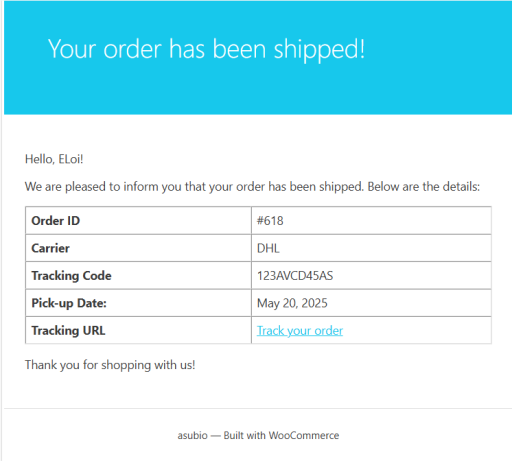
- Sends email notifications with tracking details.
- Supports multiple carriers with customizable tracking URLs.
- Auto-completion of shipped orders after a user-defined period.
- Multi-language support (French, Italian, Spanish, Portuguese).
3. Installation Guide
- Download and unzip the plugin or upload the ZIP file via the WordPress dashboard.
- Go to Plugins > Add New, click Upload Plugin, and activate it.
- Ensure WooCommerce is installed and active.
- Make sure High-performance order storage is enable in Settings > Advanced > Features.
- Go to WooCommerce > Settings > Shipment Tracking to configure the plugin.
4. Settings Page Overview
- Customize the shipped label color
- Add/edit shipping providers and customize tracking URLs.
- Enable/disable email notifications.
- Enable auto-completion of shipped orders and set the number of days.
- Option to delete plugin data on uninstall.
5. How to Use the Plugin
5.1 Marking an Order as Shipped
- Fisrt you have to configure your carriers in Shipment Tracking settings
- Go to an order in the WooCommerce orders list or the in the edit-order page.
- If in the Orders List, click in the truck logo and enter carrier name, tracking code and pick-up date in the modal form.
- If in the edit-order page, change the status to Shipped and enter the details in the Order Tracking metabox

5.2 Viewing Tracking Details
Customers can view tracking information under My Account > Orders. The carrier link leads directly to the shipment status page.

5.3 Email Notifications
Customers receive an email with tracking details when an order is marked as Shipped.

6. Frequently Asked Questions (FAQ)
- How do I add a new shipment?
Change the order status to “Shipped” and enter the required details. - Can I remove shipment details after adding them?
Not directly. Re-enter details when changing the status again. - Does the plugin support multiple carriers?
Yes, and URLs are customizable. - Will customers get tracking emails?
Yes, if the option is enabled. - Can orders be auto-completed?
Yes, you can define a period for auto-completion. - Is all data deleted when uninstalling?
Only if the delete option is enabled in the settings.
7. Troubleshooting
- If the “Shipped” status doesn’t appear, make sure the plugin is activated.
- Check if WooCommerce is up-to-date and properly configured.
- Verify all required fields (tracking code, etc.) are filled when changing status.
8. Uninstallation & Data Removal
Uninstall via the Plugins menu. Enable data removal in settings if you want to erase tracking data completely.
9. Changelog
1.0.0
Initial release.
10. Support & Contact
For support, visit the WordPress plugin support forum or contact us at [email protected].
